Skip to content

Google sign-in (OAuth) authentication

Let visitors sign in and register on your Listivo site with their Google account. You create a project and an OAuth client in the Google API Console, then paste the client ID and secret into the Listivo Panel.

2 minute read

Listivo Theme allows your visitors to log in and register via Google, like this:
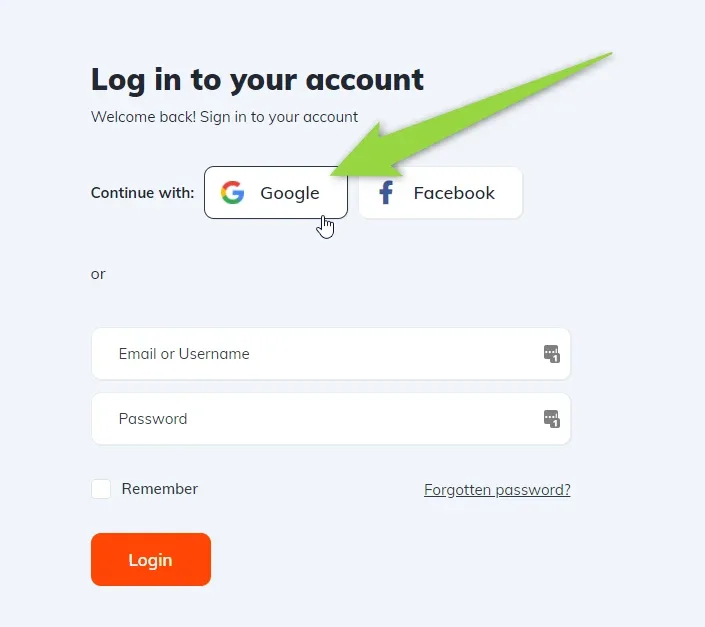
Listivo login box “Log in to your account” with “Continue with:” Google and Facebook buttons above email, password, Remember and an orange Login button. A green arrow points at Google.

Below you find the instructions on how to configure it.

Create a Google project

  1. 1 Open the Google API Console

    Visit https://console.developers.google.com/.

  2. 2 Create a new project

    If this is your first Google API key, Google will ask you to create a “New Project”.
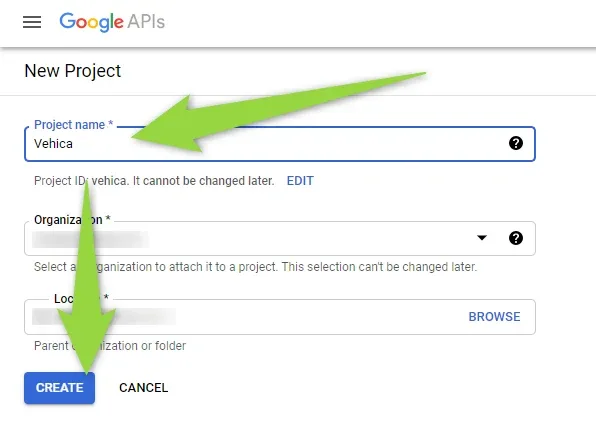
    Google APIs “New Project” form, Project name filled in as “Vehica”, with Organization and Location fields and a blue CREATE button. Green arrows point at the name field and CREATE.
  3. 3 Start creating credentials

    Back in https://console.developers.google.com/, open Create Credentials and choose “OAuth client ID”.
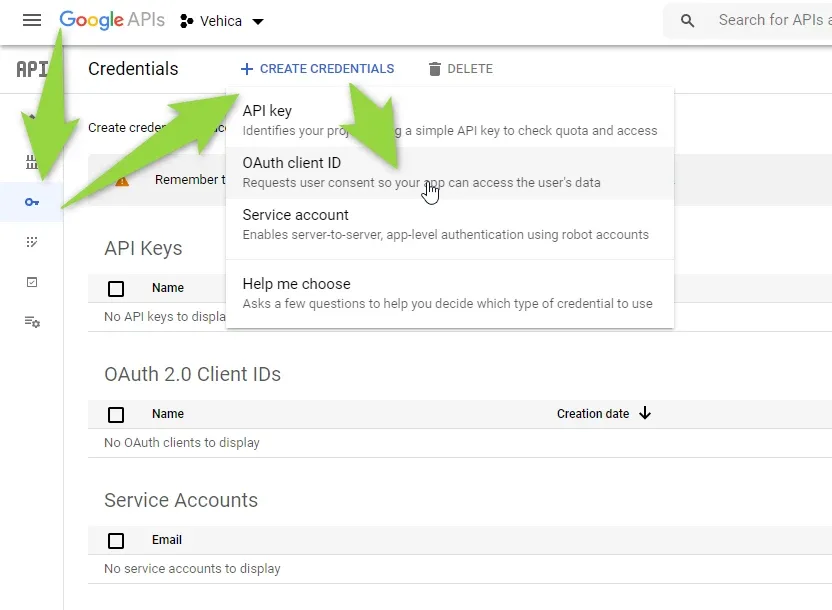
    Google APIs Credentials page with the “+ CREATE CREDENTIALS” menu open — API key, OAuth client ID, Service account, Help me choose. Green arrows point at it; the tables below are empty.
  4. 4 Configure the consent screen

    If you do not have a product name yet, you will need to click “Configure Consent Screen”. If you have it already, skip ahead to “Create the OAuth client ID” below.
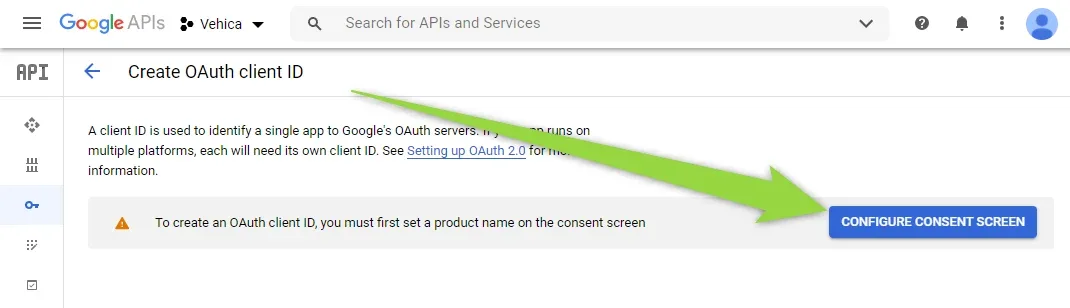
    The “Create OAuth client ID” page with an amber warning that a product name must be set on the consent screen first, and a green arrow pointing at the blue CONFIGURE CONSENT SCREEN button.

Fill in the consent screen

  1. 1 Select the user type

    Select User Type: External.
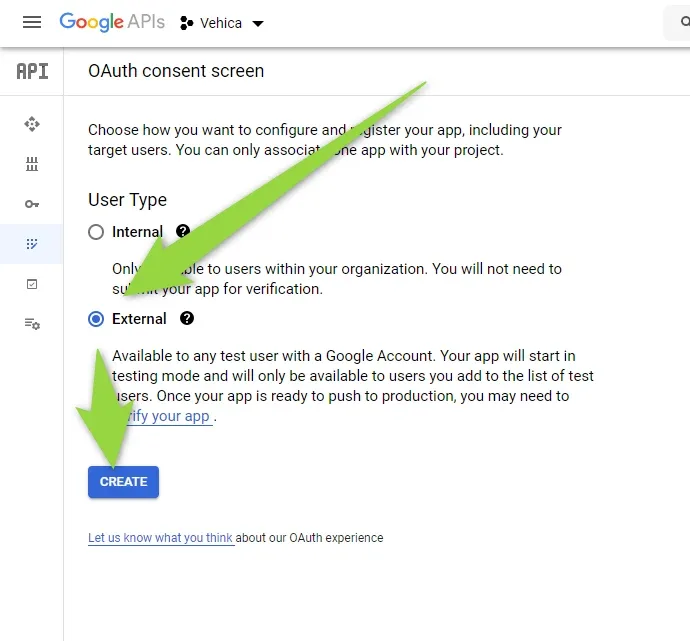
    OAuth consent screen page with User Type set to External and Internal greyed out, above a blue CREATE button. Green arrows point at External and CREATE.
  2. 2 Add the app name and support email

    Add “App name” and “User support email”.
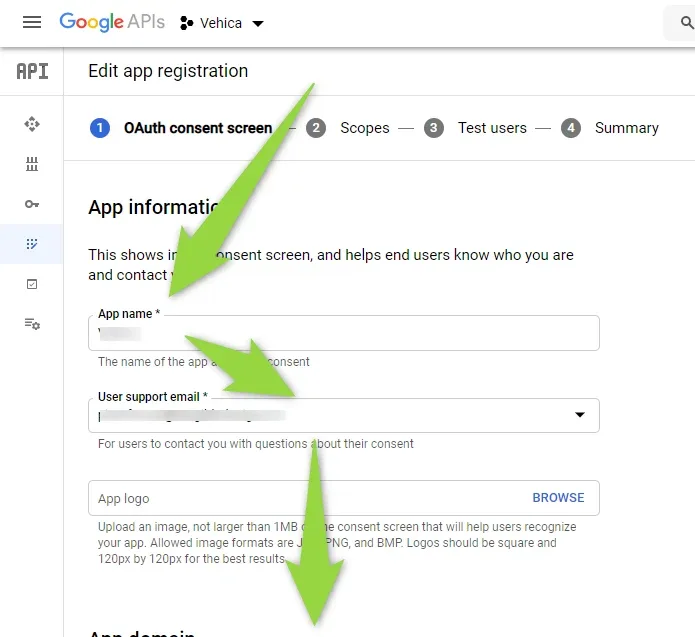
    Step 1 of “Edit app registration”: the App information form with blurred App name and User support email fields and an App logo upload box. Green arrows point at each field.
  3. 3 Add the authorized domain and contact

    Add the authorized domain and Developer Contact Information, then click “Save and Continue”.
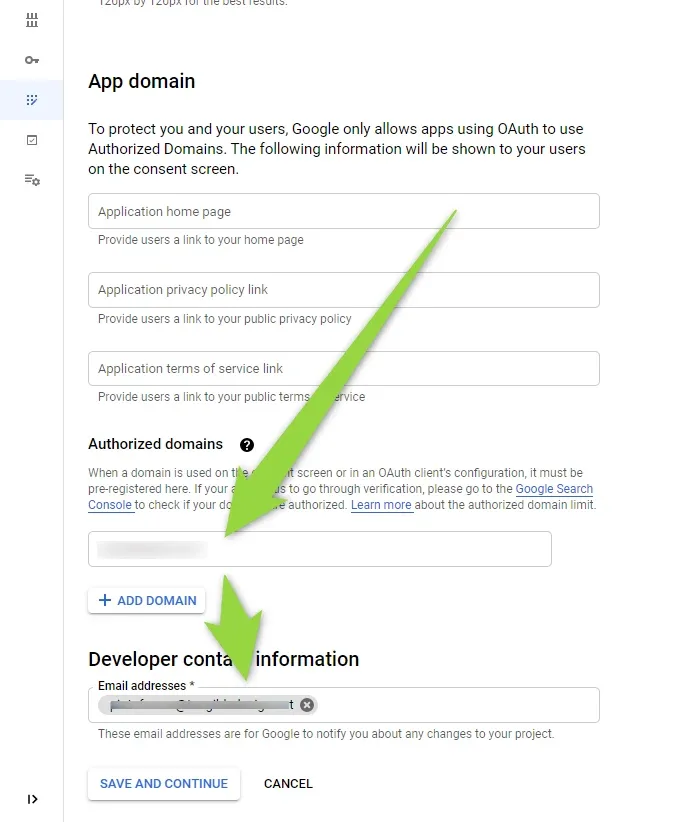
    The App domain section: home page, privacy policy and terms link fields, an Authorized domains box with one blurred entry and ADD DOMAIN, a blurred developer contact email, and SAVE AND CONTINUE.
  4. 4 Skip the scopes

    Scopes – just click “Save and Continue”.
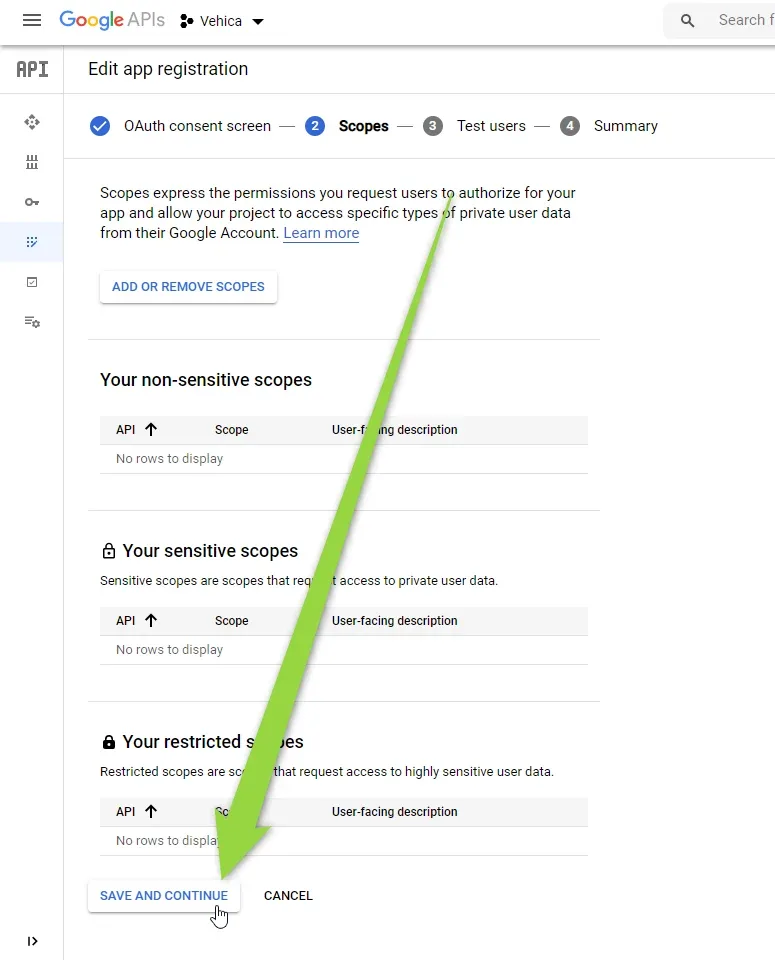
    Step 2, Scopes: an ADD OR REMOVE SCOPES button and three empty tables for non-sensitive, sensitive and restricted scopes. A green arrow points at SAVE AND CONTINUE.
  5. 5 Skip the test users

    Test Users – just click “Save and Continue”.
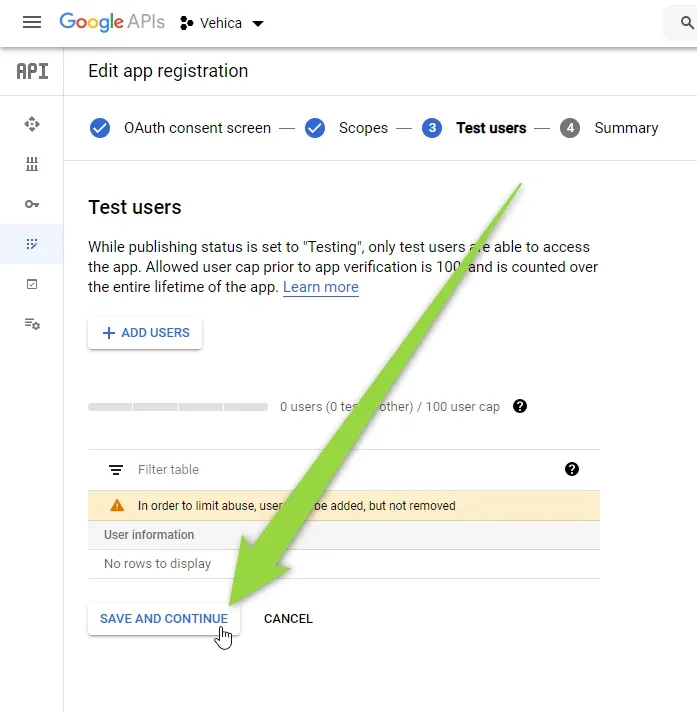
    Step 3, Test users: an ADD USERS button, a counter reading 0 users of a 100 user cap and an empty table. A green arrow points at SAVE AND CONTINUE.
  6. 6 Go back to the dashboard

    In the last step just click “Back to Dashboard”.
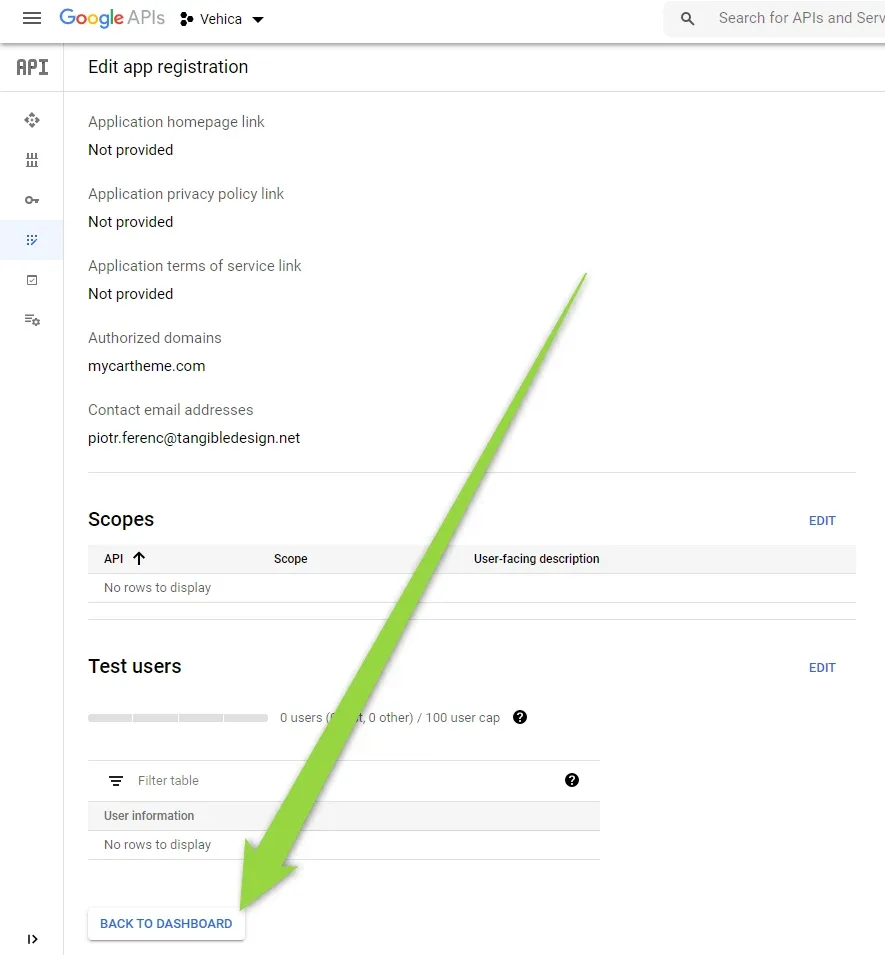
    Registration summary: homepage, privacy policy and terms links all “Not provided”, authorized domain mycartheme.com, a contact email, empty Scopes and Test users tables. Arrow on BACK TO DASHBOARD.

Create the OAuth client ID

  1. 1 Create credentials

    Visit https://console.developers.google.com/ and create credentials: “OAuth client ID”.

    The Credentials page again with the “+ CREATE CREDENTIALS” menu open and OAuth client ID among the options, above empty OAuth 2.0 Client IDs and Service Accounts tables.
  2. 2 Select Web application

    Select Web application as the application type.
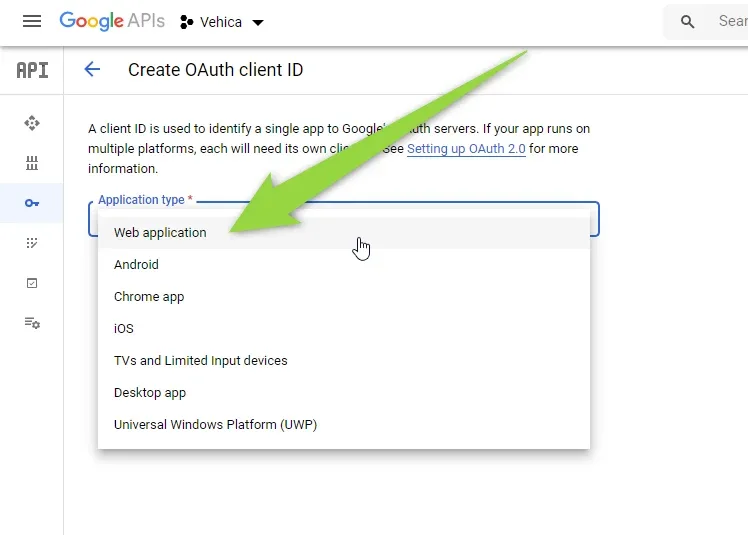
    “Create OAuth client ID” with the Application type dropdown open: Web application, Android, Chrome app, iOS, TVs and Limited Input devices, Desktop app, UWP. An arrow points at Web application.
  3. 3 Copy the callback URL from your panel

    Now comes the most important part of the configuration. You need to add the Callback URL to “Authorized redirect URLs”. You can find it in your Listivo Panel and copy it:
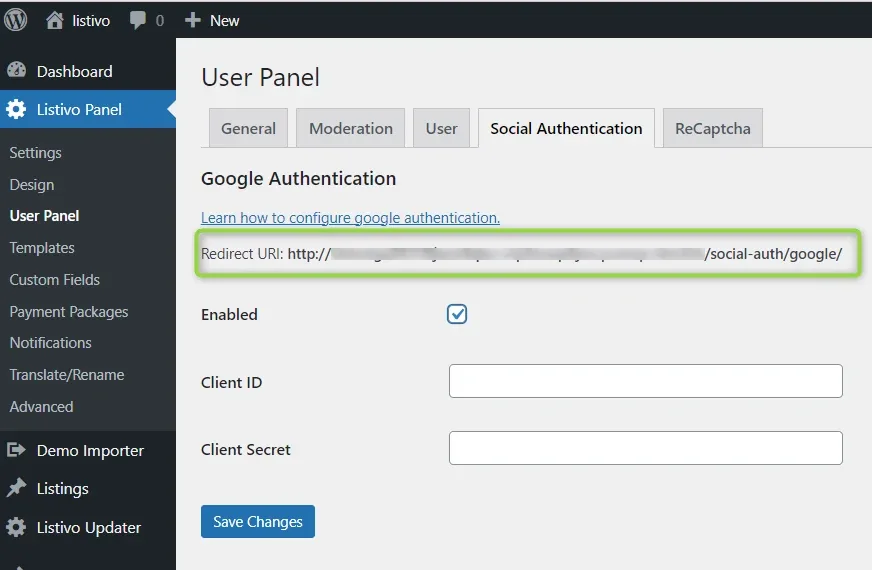
    Listivo Panel → User Panel, Social Authentication tab. Under Google Authentication a Redirect URI ending in /social-auth/google/ is highlighted; Enabled is ticked and Client ID and Secret are empty.
  4. 4 Paste it into Authorized redirect URIs

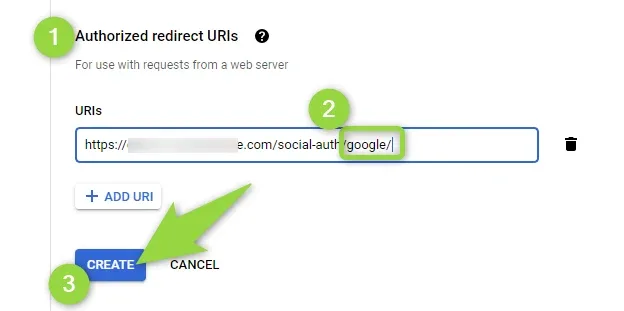
    Paste the URL into the Authorized redirect URIs section of the OAuth client form.
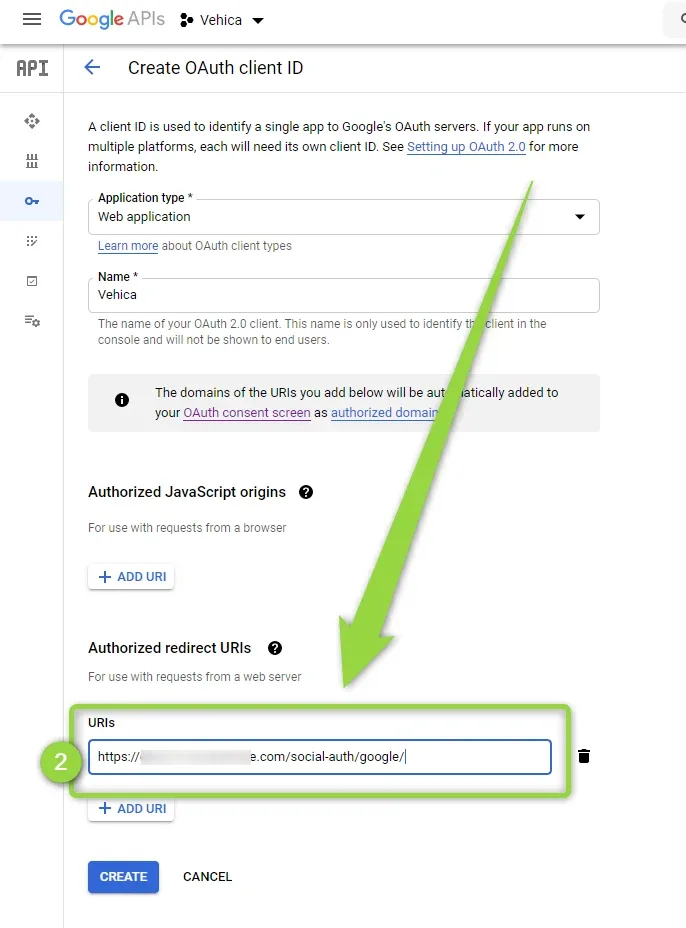
    The Create OAuth client ID form: type Web application, Name “Vehica”, an empty Authorized JavaScript origins section, and a /social-auth/google/ URL boxed in green under Authorized redirect URIs.
Check these two things before you click Create
1) The link goes in the “Authorized redirect URIs” section — not the “Authorized JavaScript origins” section. 2) You copied the “Google” link from the Listivo Panel, not the Facebook one – https://domain.com/social-auth/google/. When you are sure about it, click the “Create” button.
Close-up of Authorized redirect URIs marked 1, a URL ending in /social-auth/google/ in the URIs field marked 2, and a green arrow pointing at the CREATE button marked 3.

Finish in the Listivo Panel

  1. 1 Copy your client ID and secret

    Copy Your Client ID and Your Client Secret from the confirmation dialog.
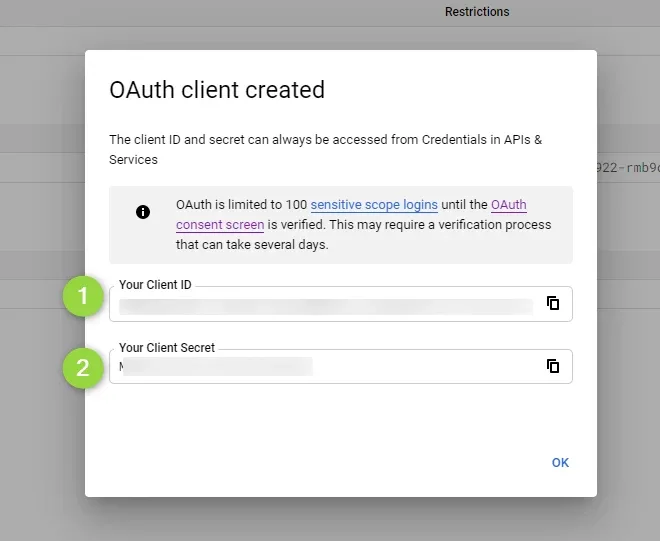
    The “OAuth client created” dialog, noting OAuth is limited to 100 sensitive scope logins until the consent screen is verified, with blurred Your Client ID (1) and Your Client Secret (2).
  2. 2 Paste them into the Listivo Panel

    Paste both values into the Google Authentication section of the Listivo Panel.
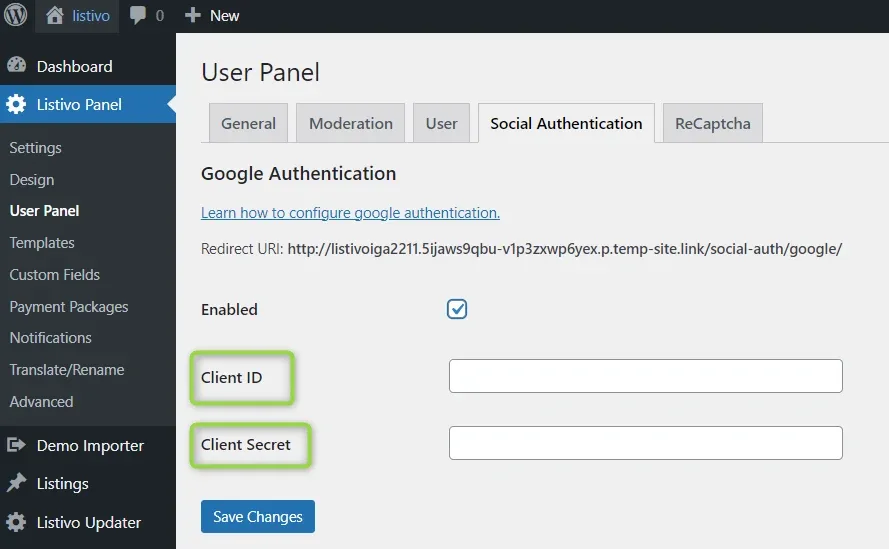
    Listivo Panel → User Panel, Social Authentication tab: the full Google Redirect URI, a ticked Enabled checkbox, and the Client ID and Client Secret labels outlined in green above empty fields.
  3. 3 Enable Google authentication

    Please make sure you checked the “Enable Google Auth” checkbox, then save the changes.

    The same Social Authentication tab — the checkbox above Client ID and Client Secret is labelled “Enabled” and is already ticked; the two field labels are outlined in green.

Done. Now your users can use their Google Account this way:

The finished result: the Listivo “Log in to your account” box offering “Continue with:” Google and Facebook above the email and password fields and the orange Login button.

Ask the people who build Listivo

We answer by email from support@tangiblewp.com. With Premium Support, we also fix your site when something breaks.

Was this guide helpful?